

Obviously, only Vibram Classic users will notice the little nuance in the photo above.
For those who didn’t catch it, the tab is tucked [mostly] flush to the heel instead of just sticking out. This has been a constant source of annoyance for myself and other Classic users – especially since the tab tends to go off-center for whatever reason when you just leave it alone.
I know it’s just a cosmetic issue… but if it could be solved then why not, right?
I’ve considered just cutting the cord altogether – since I’ve been hearing a lot of good things about people who have done it. Alas, I’m not quite sure sure if I’m ready to take the plunge and do anything with my Classics that can’t be reversed to a certain degree.
So I decided to be content (at least for the meantime) in trying solve the annoyance of the tab sticking out arbitrarily. Here’s the simple solution I came up with.
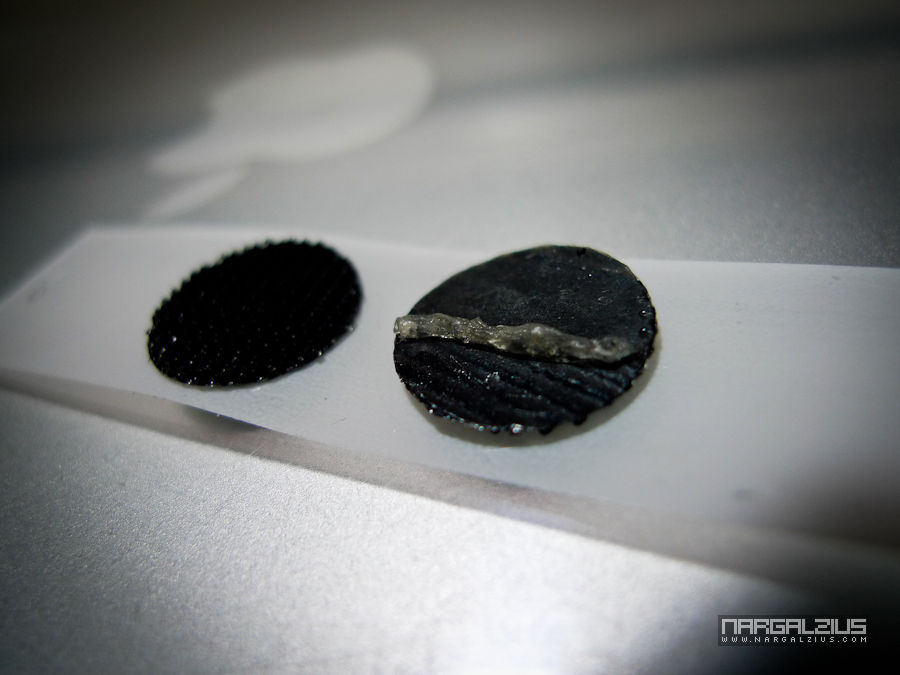
What you’ll need
- Vibram Classics
- Velcro (preferably coins for neatness – as well as non-stick; as you’ll have to take out the adhesive anyway)
- Glue of choice (I would be more specific about this, but I can’t… more on this later)
- Any other tool you feel would make your life easier with regards to applying glue, cleaning up, etc.
Procedure
Step one: If you weren’t able to source non sticky-back circular velcros, take the time to take out the adhesive material on what you plan to use on the rubber.
Personally, I didn’t do it to the fluffy side since it was too difficult to do on that particular part. More on this on the next step.
Step two: Glue one part (non-fluffy) to the VFF heel, and stick the other to the tensioner as shown in the picture below.

Luckily, the size of the velcro coins I had purchased seems to line up perfectly with the rounded corners of the tensioners so they cosmetically fit like gloves (not that you’ll see them, but like they say: God in the details hahahaha)
Note that because you’re just using the regular adhesive tape for the velcro on the tensioner, this will probably wear out after a few washes/soaks. That said, I’d rather wait for that to happen and just slap a new velcro part on it (they’re dirt cheap anyways)
However, if you’re lucky enough to source a velcro that’s self-mating (has the exact same surface that can fasten together) chances are the adhesive will be as easy to take out as the non-fluffy part of the regular velcro.
In that case however, I’d opt to use a waterproof adhesive (3M) for joining that and the tensioner – since the tensioners surface are pretty much flat and solid (unlike the curved, flexible rubber heel), you’ll probably be able to get a decent “tape” bond without having to resort to glue. This is pure speculation though – just thought I’d throw that disclaimer out there 😉

And there you have it! It’s a pretty straightforward process… I can foresee that the major issue will really have something to do with what type of glue you use… that, and how “messy” the workmanship will be.
Limitations
There are two limitations to this modification AFAIK
You may have to use a combination of glues
I’ve tried Shoe glue, Epoxy, and construction adhesive so far. The best was the latter as it was flexible even after adhesion.
However, I’m not sure if it’s because I was too impatient to let it cure, but a moderate pull from the velcro could break the bond from the rubber. 1 but it still adhered strongly to the velcro Epoxy seems to be the strongest in adhering to the rubber, but it doesn’t quite do as well to the surface of the velcro. Same goes with the shoe glue.
I am currently doing a combination: epoxy on the rubber, then after drying, applying the construction adhesive to the surface and the velcro. I’ll see how that turns out in a couple of hours/days
And I even haven’t got to test how the glue reacts when washing them. So the definitive glue to use for this is still anyone’s guess
Modification is usually practical if you don’t need to tighten the shoe
In other words, it’s more beneficial to users when the tensioning strap is always at its loosest. The tigher you go, the more “strap slack” is generated at the back. Remember, the velcro is at the tensioner and not the actual tab. So if you really tighten the shoe and have the strap stretched way beyond the tensioner, the tab will probably hit the ground given the angle the velcro affixes the tensioner.
Notes
| ⇡1 | but it still adhered strongly to the velcro |
|---|
Dude, I think you meant heel when you say “sole”
Hahaha, good catch. I actually was thinking/referring to the entire rubber portion – so parang the heel portion of the [WORD IN QUESTION HERE] – and “soles” seemed like a more encompassing term.
In any case, pwede din naman intindihin in a localized context, so I changed it to heel 🙂