
Ever since I was forced to use our DSL modem as a router (instead of the AirPort Extreme), I’ve been having DMZ 1 De-Militarized Zone and port forwarding issues. Apparently, these things don’t play nice on a double-NAT 2 Setting both as their own gateways setup.
The thing is, a while back, I bought this iOS app called Screens – and one of the awesome things it did was provide IP resolution anywhere without having to pay for a dynamic IP service. 3 The app itself wasn’t free, but that little feature came bundled with it. For those who don’t get the implications, it means I’ll be able to remotely connect to my PC REGARDLESS if it changes its IP – because the Screens gateway service will do the IP resolving for you.
Sufficed to say, I was never able to utilize this awesome feature because my said topology… until a few days ago.
As I said, going in a double-NAT will give you headaches if you try to get a working DMZ/Port forwarding setup. So you have no choice but to set all but one of your gateways as bridges. Essentially disabling any advanced features it may have so all gateway controls are set at the main router.
In this case, (and because of my dilemma with PLDT DSL) I had to sacrifice the wonderful UI of my AirPort Extreme and simply slave it to the ZyXel modem – which isn’t the most user-friendly modem/router one could use. So I’ve documented the settings I used just so I wouldn’t have to redo the wheel should I need to start from scratch.
Step 1: Set AirPort Extreme to bridge mode.
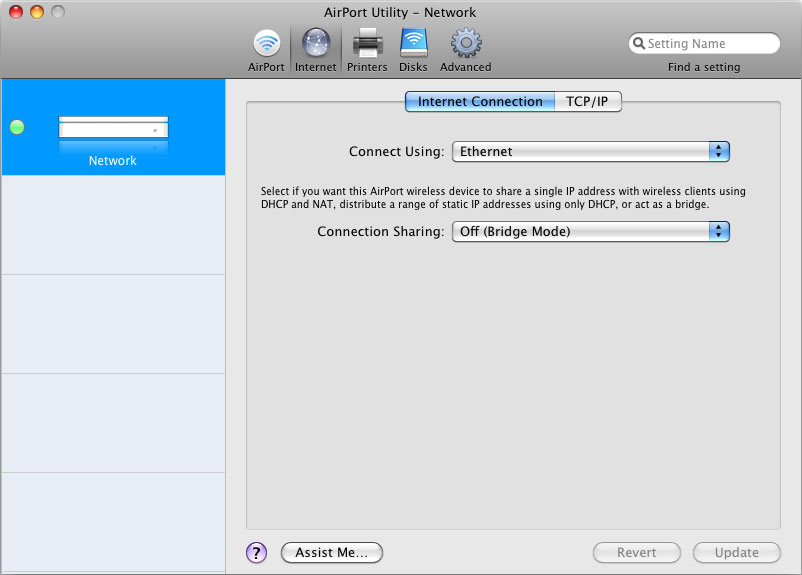
As you can see from the picture, once you do this, you practically lose any advanced settings/features except those that are proprietary to the AE (i.e. wireless signal, 4 only the signal, the actual assigning of IPs will now be managed by the ZyXel print server, disk sharing via USB, yadda yadda), and any gateway related setting will have to be managed through the main router. Quite a price to pay, but I guess its worth it – it’s not like you have to constantly change your network settings anyways.
Step 2: Configure the Modem/Router
One benefit of setting the AE to bridge though, is that it makes it much easier to access the interface of the router without having to make sure the IPs aren’t conflicting (as they could be on a double-NAT), or having to bypass the AE and directly connect to the router when setting up. You type in 192.168.1.1 and you know it’ll never resolve to the AE.

So here you just setup the internet connection like you would normally via the AE or any other router (via PPPoE in my case) and you should at the very least have an active internet connection immediately working across your machines.
Step 3: Setup your DHCP parameters
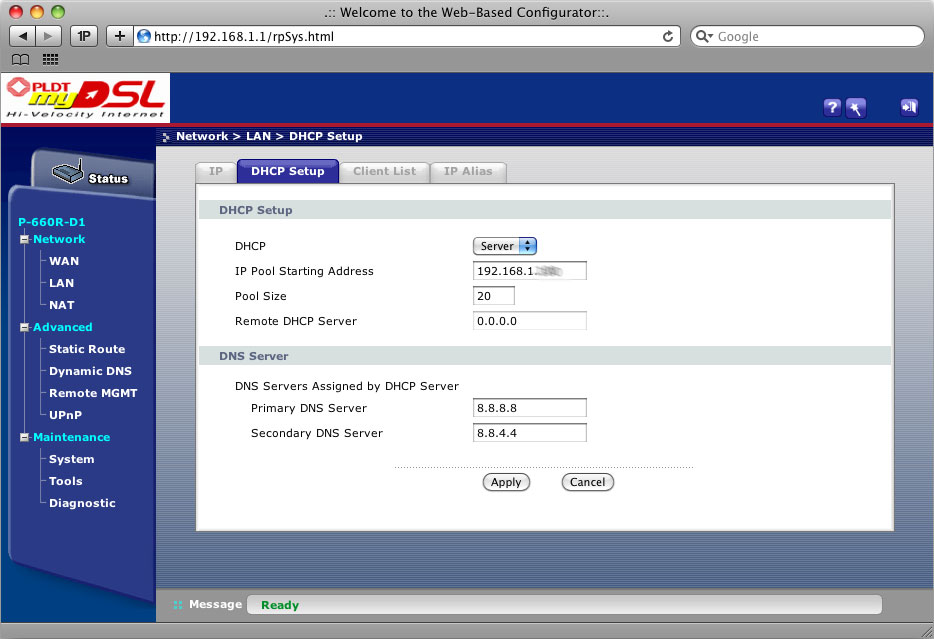
I wouldn’t say this is “integral” since this usually is done automatically, and default values work. But if you’re planning to do port forwarding, it’s good to know the IP pool you’re working with. So what you see in the picture basically just says that I want ANY machine connecting to my network to be assign an IP address starting from <blurred value> and would like a maximum of 20 clients allowed. (the latter being totally arbitrary).
In case you’re wondering what DNS settings those are – they’re Google’s public DNS server… much like openDNS, but the benefit of using Google’s is that you usually get faster responses [obviously] from any Google service (i.e. YouTube, etc.)
Step 4: Make sure you got NAT working

NAT (Network Address Translation) is what makes all this possible, it basically is a service that makes it possible for a single WAN IP usable by multiple LAN computers with their own specific LAN IPs (which we partly set up at step 3)
I’m really not an expert on it so I’ll just leave it at “make sure this is ticked off” and proceed to the next step 😉
Step 5: Nail-down Some IPs to Specific Machines
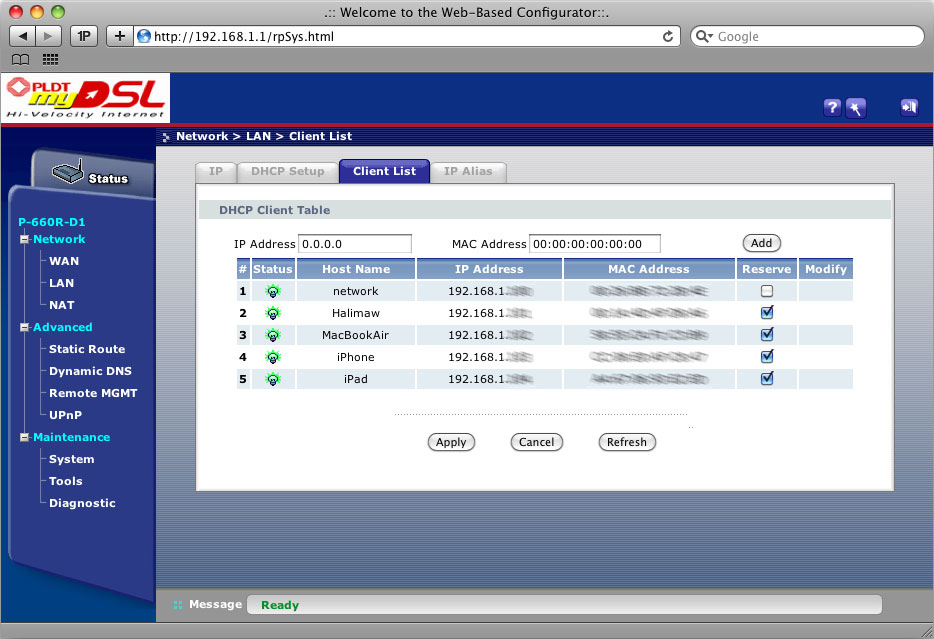
This is where you reap the benefits of steps 3 and 4. You basically know your working IP pool, you now have the option of just having it automatically assign IPs. But we don’t want that, we need to nail some machines to specific IPs to avoid second-guessing their IPs from a WAN.
While this is techinally an optional step since by logic, it still should work given how the Screens service operates, it’s just good practice to have stuff organized.
Step 6: Enable UPnP
The last thing you have to do is turn on Universal Plug and Play (UPnP). I know, I know, UPnP is evil, and if this were a Windows setup, I’d probably wouldn’t go through with it.
I’m not saying that there aren’t UPnP exploits on a Mac, but I can say that they aren’t as common as they are on the PC – just like viruses are. Plus most of the issues surrounding UPnP is usually because of an irresponsible use of the protocol by applications on the LAN. And that would vary depending on the applications you choose to use… and again, this is mostly a problem in a Windows environment because Windows programmers tend to be much more irresponsible with accessing system stuff than OSX developers are – and yes, I believe this has a lot to do with habits developed because of the actual platform they’re programming in (Windows as an OS has always been too “trusting” – and lets leave it at that.)
You can quickly read more about the implications of UPnP here and decide for yourself. As far as I’m concerned, everything seems to be in order when using UPnP on OSX.